StateBehaviour
To customize StateBehaviour, you need to create a script file for StateBehaviour and describe what you want to do.
Create StateBehaviour script file
- Right-click on the location you want to create from the Project window.
- From the right-click menu, and select “Create> Arbor > State Behaviour C# Script”.
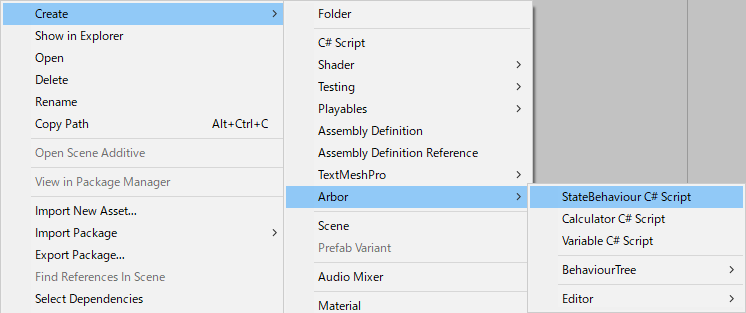
- Determined to enter the file name
Function to be called
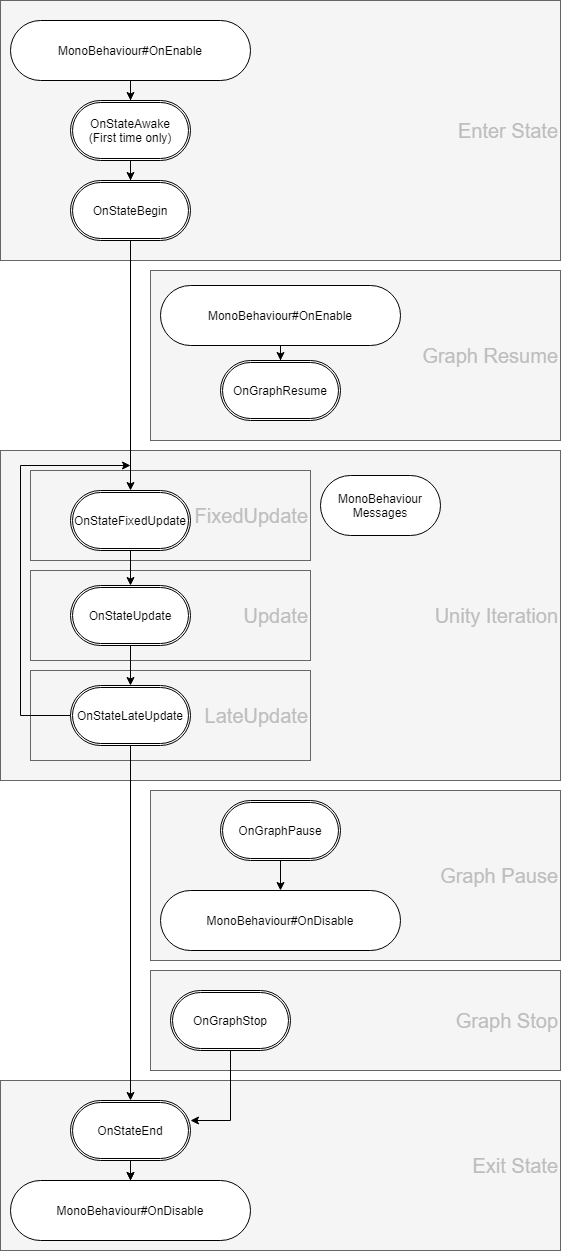
By assigning the created StateBehaviour to the state in ArborEditor, each function of the script will be called.
- OnStateAwake
It is called when it first enters the state. - OnStateBegin
It is called when transitioning to state. - OnStateUpdate
It is called at the timing of ArborFSM's Update().
Whether it is called every frame or not depends on the Update Settings of ArborFSM. - OnStateLateUpdate
It is called at the timing of ArborFSM's LateUpdate().
Whether it is called every frame or not depends on the Update Settings of ArborFSM. - OnStateFixedUpdate
It is called at the timing of FixedUpdate() of ArborFSM. - OnStateEnd
It is called when leaving the state. - OnGraphPause
Called when a graph is paused while playing. - OnGraphResume
Called when a graph is resumed from pause. - OnGraphStop
Called when a graph stops playing. - MonoBehaviour message functions
For details, please see the MonoBehaviour Messages of Unity ScriptReference.
Execution Order
- If multiple StateBehaviours are added to the node, they are called in order from the top.
- MonoBehaviour messages are invoked according to the order of execution by Unity.
For details, refer to Event function execution order in Unity Manual.
Fields and Arbor Editor
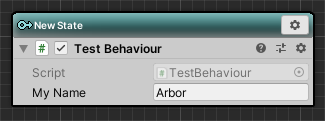
You can edit it in Arbor Editor by declaring a field with public or SerializeField attribute added to the created script.
|
|
It is similar to editing a field from the Inspector.
For details, refer to the following Unity manual.
- Inspecting scripts
- Script Serialization for more information.
State connection
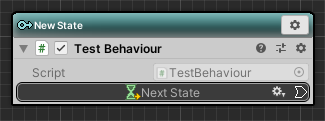
Added StateLink type field
By declaring StateLink with the public or SerializeField attribute added to the created script, connection slots will be displayed in Arbor Editor.
|
|
Transition to connection destination
It is referred to as the Transition in the transition you want to timing.
|
|
Data flow
It is possible to input / output values by data flow.
For details, see Scripting : Data flow.
async/await
It supports asynchronous wait by async/await.
See async/await for more information.
Additional explanation
- The file name and class name must be the same.
- If the file is placed under a special folder such as Editor folder, it will not be recognized.
- The AddComponentMenu("") that is automatically given is to prevent it from being displayed in Inspector's Add Component.
- We do not support the behavior of adding directly to GameObjects without going through the graph.
- The C# script needs to be compiled to reflect the changes.
If you have turned off Auto Refresh in Preferences, for example, you will need to manually do “Assets > Refresh” from the menu. - MonoBehaviour's enabled is used internally for execution control, so please use the alternative behaviourEnabled.